Nginx 简介
Nginx(发音:engine X)是一款轻量级的 HTTP 服务器(相比于Apache、Lighttpd而言),同时是一个高性能的 HTTP 和反向代理服务器。
NGINX is a free, open-source, high-performance HTTP server and reverse proxy, as well as an IMAP/POP3 proxy server. NGINX is known for its high performance, stability, rich feature set, simple configuration, and low resource consumption.
-Nginx Official
Nginx 特点
Nginx 特点
- 热部署
- 可以高并发连接
- 低的内存消耗
- 处理响应请求很快
- 具有很高的可靠性
Nginx 作为 HTTP 服务器的几项基本特性:
- 处理静态文件,索引文件以及自动索引;打开文件描述符缓冲
- 无缓存的反向代理加速,简单的负载均衡和容错
- FastCGI,简单的负载均衡和容错
- 模块化的结构,包括 gzipping, byte ranges, chunked responses, 以及 SSI-filter 等 filter。
- 支持 SSL 和 TLSSNI.
使用场景
使用场景
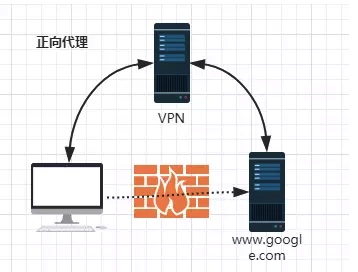
- HTTP 代理服务
- 负载均衡
- 基于 Nginx 的安全防护
- Nginx Lua 开发
- 资源缓存
- 静态资源 Web 服务
- 动静分离
- 访问认证
- HTTPS 服务
- 灰度发布测试
Nginx 主要功能
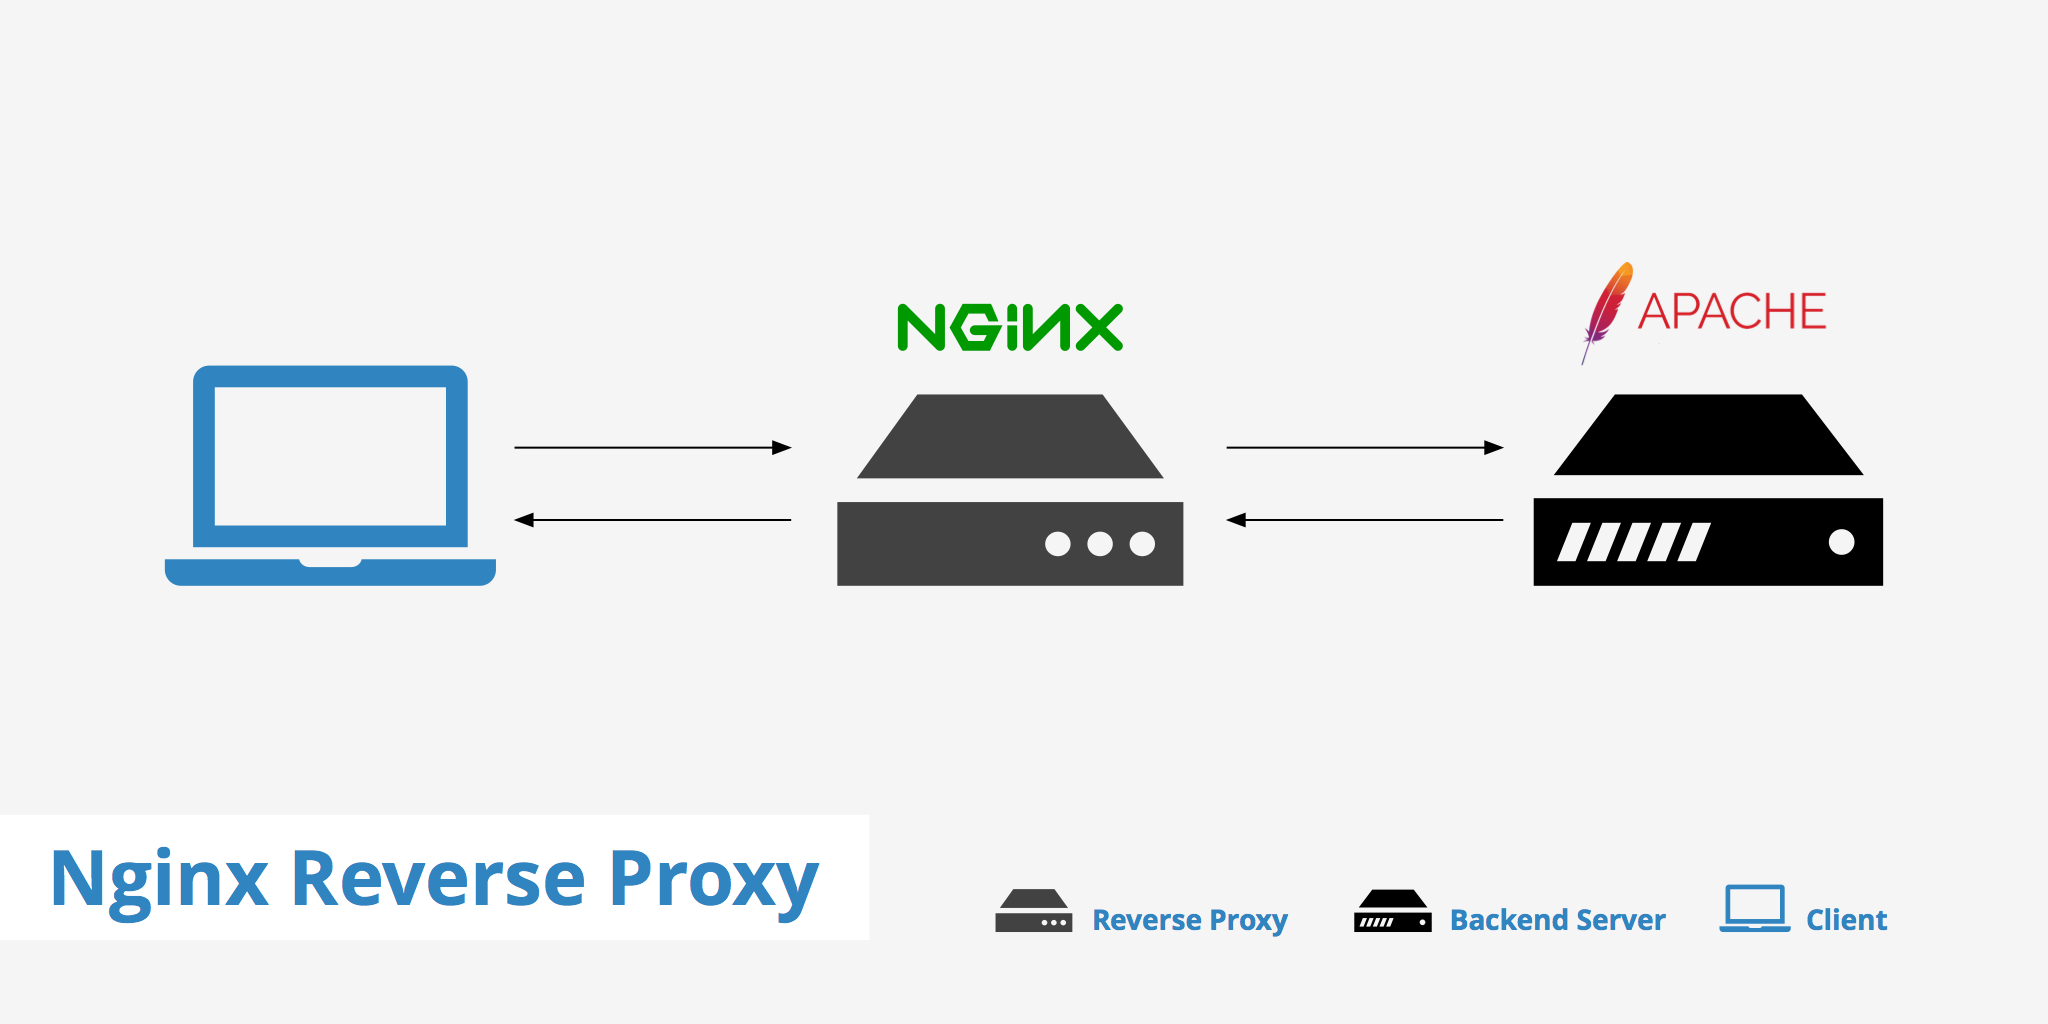
Nginx 反向代理
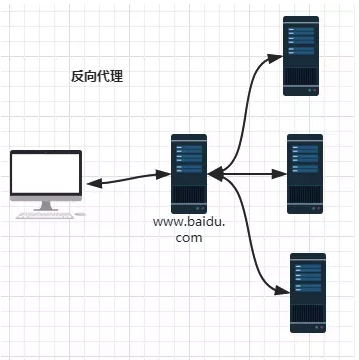
Nginx 反向代理
Understanding Nginx HTTP Proxying, Load Balancing, Buffering, and Caching
NGINX REVERSE PROXY
WebSocket proxying
反向代理的注意点
- 请求
Header中所有的空的字段不会被传递; - Nginx 在默认配置下不会传递
Header中带下划线的字段,需要进行配置后才支持underscores_in_headers on; Header的 “Host” 字段会被重写成$proxy_host。
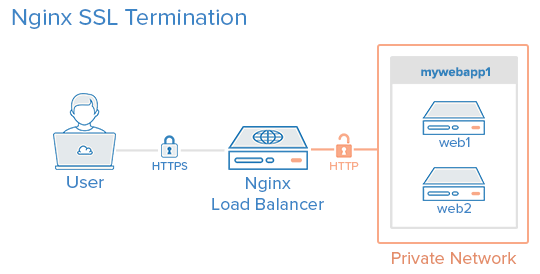
How To Set Up Nginx Load Balancing with SSL Termination
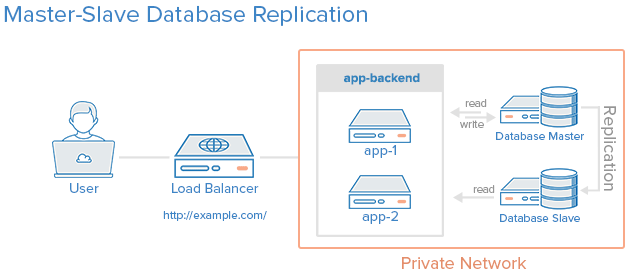
反向代理的好处
- 统一的应用入口。可以简化登陆控制、可以使用同一个 SSL 证书(SSL Termination)来避免多证书产生的问题。
- 可以构建私有网络,来保证内部数据访问安全。
- 便于基础设施的弹性伸缩和透明维护。通过 Nginx 来切割流量的方向,来实现扩容和维护。
- URL 重写、压缩、缓存等。
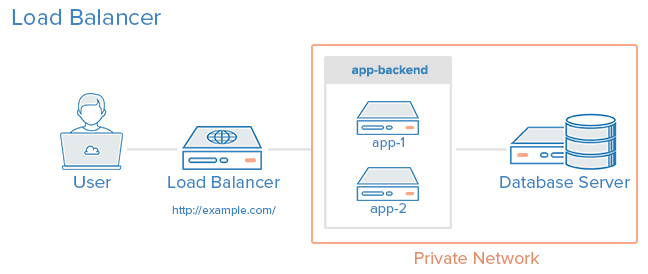
Nginx 负载均衡
Nginx 负载均衡
5 Common Server Setups For Your Web Application
Using nginx as HTTP load balancer
负载均衡的方式,主要分三种:
1.循环(round-robin) - 请求通过循环的方式分配给各个服务器。这种当时可以给每个服务器加上不同的权重。
2.最少连接数(least-connected) - 下一个请求将分配给当前激活连接数的最少服务器。在请求耗时较长时起到负载均衡的作用。
3.IP哈希(ip-hash) - 根据当前请求的IP,进行哈希运算后,分配到某个服务器上。前两种负载均衡的方案不能实现来自同一个 IP 的请求都发到同一台服务器上,IP哈希的方式就可以实现。
如何使用 Nginx
安装并启动 Nginx
Mac
安装
1 | # 先执行brew update保持软件依赖包都是最新的 |
运行
用浏览器打开 http://localhost:8080 看到 Nginx 的欢迎信息。
修改默认端口
1 | # 下面的1.8.0请根据最新安装版本号对应修改 |
检查配置文件语法是否有误并且重新加载配置:
1 | nginx -t && nginx -s reload |
Nginx 基本使用
Nginx 相关指令
启动:
sudo systemctl start nginx重启:
sudo systemctl restart nginx重载:
sudo systemctl reload nginx停止:
sudo systemctl stop nginx设置开机启动:
sudo systemctl enable nginxNginx 命令帮助
终端输入 nginx -h 查看。
Nginx 配置
nginx documentation
nginx服务器安装及配置文件详解
nginx做负载均衡器以及proxy缓存配置
查看默认配置文件
1 | cat /usr/local/etc/nginx/nginx.conf.default |
一份不错的注释
1 | # user字段表明了Nginx服务是由哪个用户哪个群组来负责维护进程的,默认是nobody |
Nginx 配置最佳实践
Nginx 配置最佳实践
上面的
配置文件最后一行 include 关键词会将 /usr/local/etc/nginx/sites-enabled/ 文件夹下面的所有文件都加载进当前的配置文件,这样子就可以将配置文件分离,nginx.conf 这个配置文件修改之后以后基本不会修改,配置不同站点的时候只需要在 /usr/local/etc/nginx/sites-enabled/ 不断增加新的文件即可,这是比较好的配置方式。比如我在
/usr/local/etc/nginx/sites-enabled/ 下面增加了两个文件,用来配置普通的 HTTP 服务还有 HTTPS 服务:1 | touch /usr/local/etc/nginx/sites-enabled/default |
default 配置解析
default 配置解析
Nginx 整个配置的结构大致如下:1 | ... |
对比上面我的
nginx.conf 文件可以知道 default 文件的内容就是配置 server 部分的,下面先弄一份最基本的配置(带有详细说明):1 | server { |
上面的配置的意思就是:访问http://localhost『80端口号可以直接省略』的时候会在
/var/www/ 下面找 index.php 文件,如果没有找到就找 index.html,如果再没有找到那就找 index.htm,如果还是没有找到的话就 404 跳转到 404.html,如果你刚好将 /var/www/ 设置为 root 用户访问的话,那么就会直接无访问权限 403 跳转到 403.html。值得注意的是
server 字段里面的 root 字段,这个字段需要跟 alias 字段区分开来,通过下面两段配置解释一下:1 | # 当用root配置的时候,root后面指定的目录是上级目录 |
配置反向代理
配置反向代理
例如我有一个
Node 服务的名字是 o2blog_wx,在启动 Node 的时候访问的地址是:http://localhost:3000/,但是对外网我们希望是:http://aotu.jd.com/o2blog_wx,接下来我们将通过 Nginx 进行配置(带有详细注释)。1 | server { |
配置负载均衡
配置负载均衡
1 | http { |
负载均衡的权重
下面配置中,每 5 个请求会有三个被分配到
srv1:1 | upstream myapp1 { |
配置临时跳转
配置临时跳转
有时候我们觉得一开始配置的 URL 不好想换掉,但又不想原先的链接失效,比如一开始对外网的链接是:
http://aotu.jd.com/o2blog_wx/,后来想改成 http://aotu.jd.com/wxblog,又不想原先的失效。这个时候可以在
Nginx 上配置一个 302 临时跳转,如下(server 部分跟前面的一样):1 | location /o2blog_wx/ { |
配置限制访问
配置限制访问
在一台服务器上的资源不全部都是对外开放的,这个时候就需要通过
Nginx 配置一个限制访问,比如查看本服务器的PHP信息,我们就可以通过下面配置来实现限制访问:1 | # 当匹配到/info的时候只允许10.7.101.224访问,其它的全部限制 |
这个时候只有
IP 为 10.7.101.224 的机器才可以访问:http://aotu.jd.com/info,其它机器都会 403 拒绝访问!当然最佳的实践是将
IP 抽取出来变成白名单,这样子就可以实现部分 IP 可以访问,其它的不能访问。default-ssl 配置解析
default-ssl 配置解析
我们都知道
HTTP 在传输的过程中都是明文的,这直接导致了在传输的任何一个过程中都容易被窃取信息,所以才有了 SSL(安全套接层)以及升级版 TLS(传输层安全协议)的出现,其实就是在 HTTP 应用层给 TCP/IP 传输层的中间增加了 TLS/SSL 层,统称为 HTTPS。那如何通过
Nginx 配置 HTTPS 站点呢,下面就是 default-ssl 配置文件的内容(详细解析):1 | server { |
上面配置之后,就可以通过
https://localhost 访问我们的 Nginx 首页了。Nginx 处理请求过程
Nginx 调试
Nginx 调试
如果是通过源代码手工安装的,需要重新安装,并在安装的过程加上参数:
./configure --with-debug如果是通过包的形式安装(
sudo yum install nginx)的,可以通过命令切换到调试模式:1. 停止
nginx 进程:sudo systemctl stop nginx。2. 在
/etc/nginx/nginx.cond 中配置 error_log 的配置级别为 debug:error_log /your/log/path/error.log debug。3. 开启调试模式
sudo systemctl start nginx-debug。4. 完成。所有的 debug 数据都会记录在
/your/log/path/error.log 中。Nginx 的不足
相对于 Apache 的不足
1. apache 相对 nginx 更稳定
2. apache 模块丰富
3. apache rewrite 更能强大
4. 动态请求要 apache 去做,nginx 只适合静态和反向
如何选择
1. 要求稳定,选apache
2. 要求并发量选nginx
3. 单台服务器环境,动态请求多用apache
5. 可生产静态文件用nginx
6. 大型环境里,前端用nginx作为反向代理抗住压力,apache作为后端处理动态请求
相关链接
Inside NGINX: How We Designed for Performance & Scale
The Architecture of Open Source Applications (Volume 2): nginx
lua-nginx-module
前端工程师应该知道的Nginx
前端工程师学习Nginx入门篇